Phone:
(701)814-6992
Physical address:
6296 Donnelly Plaza
Ratkeville, Bahamas.

Phone:
(701)814-6992
Physical address:
6296 Donnelly Plaza
Ratkeville, Bahamas.
Empty living room walls feel unfinished, like a sentence without punctuation. But between blank and cluttered lies a sweet spot where walls become focal points that tie a room together. The right wall decor doesn’t just fill space, it sets mood, reflects personality, and can even solve practical problems like awkward proportions or poor lighting. Whether working with a compact apartment or a spacious family room, homeowners have dozens of options beyond the standard framed print above the sofa. This guide breaks down practical, proven wall decor strategies that work in real homes.
Walls occupy the largest visual real estate in any room, yet they’re often the last thing homeowners address. Bare walls make furnished rooms feel incomplete and echo-prone. Poorly planned decor creates visual clutter or throws off a room’s balance.
Well-decorated walls serve multiple functions. They draw the eye upward, making standard 8-foot ceilings feel taller. They establish color schemes and tie together mismatched furniture. In open-concept homes, strategic wall treatments help define separate zones without physical barriers.
From a practical standpoint, wall decor can address common issues. Dark accent walls make narrow rooms feel cozier. Light-reflecting surfaces brighten dim corners. Textured treatments improve acoustics in hard-surfaced spaces. Before selecting decor, homeowners should identify what the room needs: more light, better proportions, a focal point, or simply personality. That function drives smart choices.
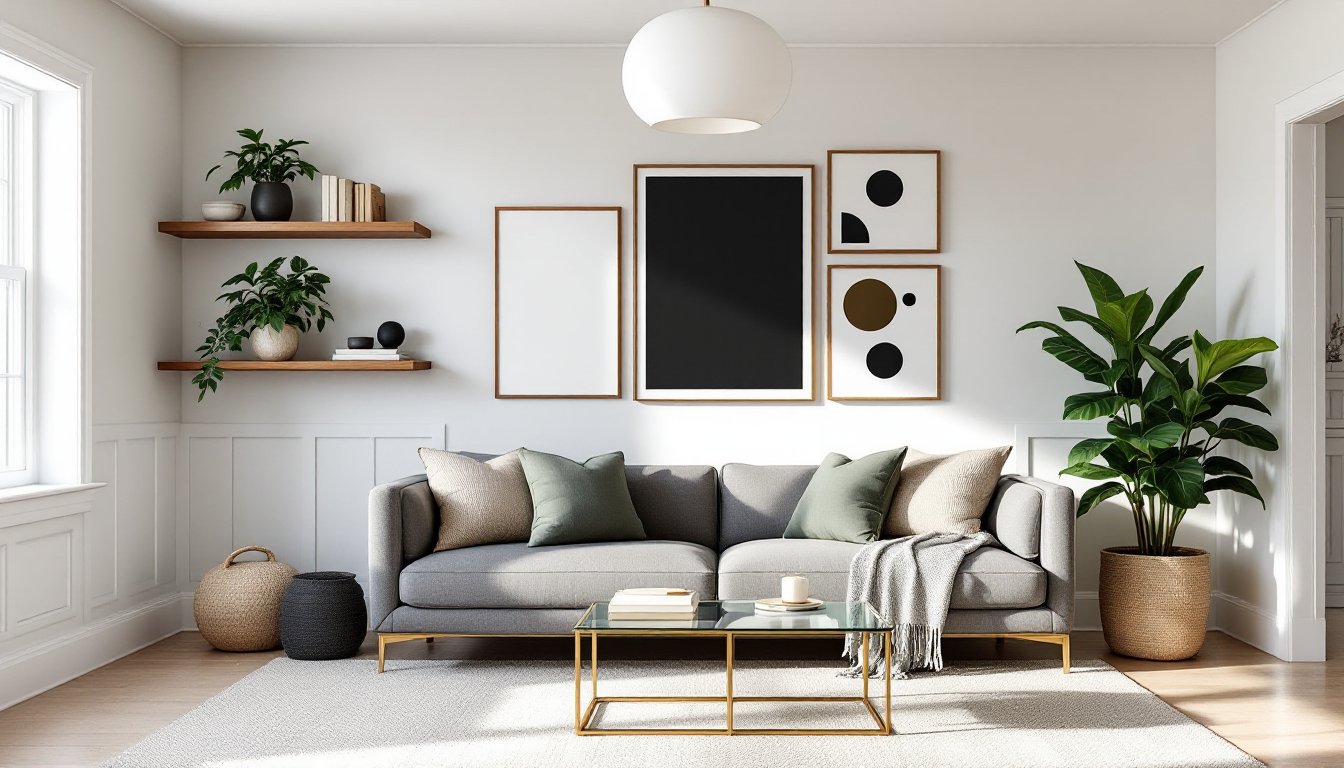
Gallery walls pack visual punch, but haphazard arrangements look chaotic. Successful layouts follow loose frameworks.
Grid layouts work best with uniform frames and mat sizes. Keep spacing consistent, typically 2 to 3 inches between frames. This approach suits modern and minimalist spaces where clean lines matter. Use a laser level or painter’s tape to mark positions before hammering.
Salon-style arrangements mix frame sizes, shapes, and even mediums (prints, photos, small mirrors, shadow boxes). Start with the largest piece at eye level (roughly 57 to 60 inches from the floor to the center of the artwork). Build outward, maintaining relatively even spacing. Lay the arrangement on the floor first and take a photo from above as a reference.
Linear galleries run horizontally above sofas or consoles. Keep the arrangement’s width to about two-thirds of the furniture width for proportion. Align either the tops or bottoms of frames rather than centering each piece individually.
For hanging hardware, picture-hanging strips work well for rentals and lighter frames. Frames over 10 pounds need wall anchors or ideally, screws into studs. Most gallery walls fail during installation, not planning, measure twice, mark lightly in pencil, and use proper anchors for the wall type (drywall anchors, toggle bolts for hollow walls, masonry anchors for brick or concrete).
Flat painted walls sometimes need tactile interest that decor alone can’t provide. Several treatments add dimension without major construction.
Board-and-batten or picture frame molding creates architectural detail on plain drywall. Standard materials include 1×2, 1×3, or 1×4 pine boards (actual dimensions 0.75″ × 1.5″, 0.75″ × 2.5″, 0.75″ × 3.5″ respectively) and MDF for painted applications. Install with a brad nailer and construction adhesive, then caulk seams and paint. This is a weekend project for most DIYers with basic carpentry skills.
Peel-and-stick 3D wall panels made from PVC or plant fiber offer texture without permanent installation, ideal for renters. Panels typically cover 5 to 10 square feet each. Cut with a utility knife or fine-tooth saw. Quality varies widely: cheaper versions show seams and warp easily.
Shiplap or tongue-and-groove planking runs horizontally for a modern farmhouse look. Real wood adds warmth but requires acclimation to the room’s humidity for 48 to 72 hours before installation to prevent gaps. Prefinished options save time. Attach directly to studs or over drywall with a nail gun, checking level frequently.
Textured paint techniques and wallpaper have improved dramatically. Removable wallpapers now include grasscloth textures, geometric patterns, and even faux brick or stone. Application is straightforward: measure, cut, peel, smooth from center outward to eliminate bubbles. These peel off cleanly when it’s time for a change, though cheaper brands may leave residue.
Always consider room humidity and purpose. Bathrooms and basements need moisture-resistant materials. High-traffic family rooms benefit from durable, washable surfaces.
Sometimes a single dramatic piece outperforms a crowded wall. Large-scale art, oversized mirrors, or sculptural elements command attention without competing visuals.
Oversized canvas or framed art works well above sofas or fireplace mantels. As a rule, artwork should span two-thirds to three-quarters of the furniture width beneath it. A 90-inch sofa pairs well with a 60- to 68-inch wide piece or diptych/triptych spanning that range. Hang with appropriate hardware, large canvases need heavy-duty picture hangers rated for the weight, or better yet, screws into wall studs.
Tapestries and textile art soften hard-surfaced rooms and improve acoustics. Modern options go beyond bohemian macramé to include quilts, woven wall hangings, and framed fabric. Mount with a decorative rod or use a concealed hanging sleeve sewn to the back for a floating effect. Textiles collect dust, so consider rooms without fireplaces or heavy cooking areas.
Architectural salvage, vintage windows, shutters, wrought iron gates, adds character in farmhouse, industrial, or eclectic spaces. Ensure pieces are clean, structurally sound, and properly sealed if they’ve been outdoors. Heavy salvage requires serious anchoring: locate studs and use lag screws, not drywall anchors.
Floating shelves with minimal styling can serve as statement pieces when the shelf itself has visual weight, thick live-edge wood, bold metal brackets, or unique geometric shapes. Keep objects sparse: three to five curated items beat a crowded display.
Mirrors are the workhorse of wall decor, especially in smaller or darker living rooms. Placement determines effectiveness.
Opposite or adjacent to windows, mirrors bounce natural light deeper into the room. A large mirror on the wall perpendicular to a window creates the illusion of an additional window. Avoid placing mirrors directly opposite busy views or televisions, the reflection can be distracting.
Oversized leaning mirrors (those resting against the wall rather than hung) work in rooms with limited wall space or for renters avoiding holes. Secure the top with furniture straps anchored to the wall to prevent tipping, critical in homes with children or pets. Standard sizes range from 65 to 75 inches in height.
Mirror groupings function like gallery walls but with reflective surfaces. Mix round, rectangular, and sunburst styles in complementary finishes (all brass, all black frames, or mixed metallics). The same spacing and layout principles apply: plan on the floor first, maintain consistent gaps, use proper anchors.
Mirrored furniture or panels add glam but can overwhelm. Use as an accent on one wall or in a niche rather than floor-to-ceiling. Antique mirror tiles with foxing (that cloudy, aged patina) add character without the stark reflection of new glass.
For installation, mirrors are heavy. A 3×5-foot mirror can weigh 30 to 50 pounds. Use D-rings and picture wire on the back, with heavy-duty wall anchors or screws into studs. For mirrors over 50 pounds, consider French cleats, a two-piece interlocking bracket system that distributes weight evenly.
The best wall decor works double duty, especially in smaller homes where every square foot counts.
Wall-mounted shelving displays books, plants, or collections while freeing floor space. Floating shelves keep the look clean: visible bracket shelves handle heavier loads. Standard shelf depth is 8 to 12 inches for display, up to 16 inches for media equipment. Install into studs whenever possible, especially for shelves holding more than 20 pounds.
Pegboard or slat walls organize everything from tools to plants to kitchen items, and they’ve gotten stylish. Modern versions come in wood, metal, and painted finishes. Mount with furring strips to create space behind the board for hook insertion. This is a smart accent wall in mudrooms, home offices, or hobby spaces that open into living areas.
Chalkboard or cork board walls serve families with kids or anyone who likes visual planning. Magnetic paint under chalkboard paint adds another layer of function. Apply primer, then two coats of magnetic paint (which is really iron-infused), then chalkboard or dry-erase topcoat. Expect to use more product than standard paint, coverage is often 50 to 100 square feet per gallon rather than the typical 400.
Mounted planters and vertical gardens bring biophilic design indoors. Wall-mounted options range from individual ceramic planters to modular living wall systems. Ensure proper drainage or use a backing board to protect the wall from moisture. Pothos, philodendron, and snake plants tolerate indoor conditions and low light.
Hooks and racks in decorative finishes turn coats, hats, and bags into intentional displays. Shaker pegs, vintage hooks, or modern minimalist designs mount with basic screws and anchors. Space hooks 4 to 6 inches apart for functionality.
Living room walls offer more potential than most homeowners realize. Whether choosing a gallery wall, textured treatment, bold statement piece, strategic mirror, or functional display, the key is intentionality. Measure carefully, use proper mounting hardware for the wall type and item weight, and don’t skip prep work. Walls set the tone, make them count.