Phone:
(701)814-6992
Physical address:
6296 Donnelly Plaza
Ratkeville, Bahamas.

Phone:
(701)814-6992
Physical address:
6296 Donnelly Plaza
Ratkeville, Bahamas.
Small living rooms present a design challenge, but the walls offer untapped potential. Most homeowners focus on furniture placement and overlook how strategic wall decor can visually expand a cramped space. The right approach transforms a tight room into one that feels open, organized, and intentional. This guide covers proven wall decor strategies that maximize perceived space without requiring structural changes or professional installation. From reflective surfaces to vertical arrangements, these techniques work with physics and visual perception, not against limited square footage.
In compact spaces, every vertical surface counts. Bare walls make rooms feel unfinished, while poorly chosen decor can shrink them further. Wall treatments influence how the eye moves through a space, affecting perceived dimensions more than actual square footage.
Vertical real estate becomes valuable when floor space is limited. A 10×12-foot living room offers roughly 120 square feet of floor area but potentially 320 square feet of wall surface (assuming 8-foot ceilings). That’s nearly three times the usable design area.
Properly scaled wall decor directs attention upward and outward, countering the claustrophobic effect of tight quarters. Dark or cluttered walls advance visually, making boundaries feel closer. Light, intentional arrangements recede, creating breathing room. The difference isn’t subjective, it’s rooted in how human vision processes depth cues, color values, and spatial relationships.
Small rooms also amplify mistakes. An oversized painting that might anchor a spacious great room will dominate and overwhelm a small living area. Proportion matters more when margins for error shrink.
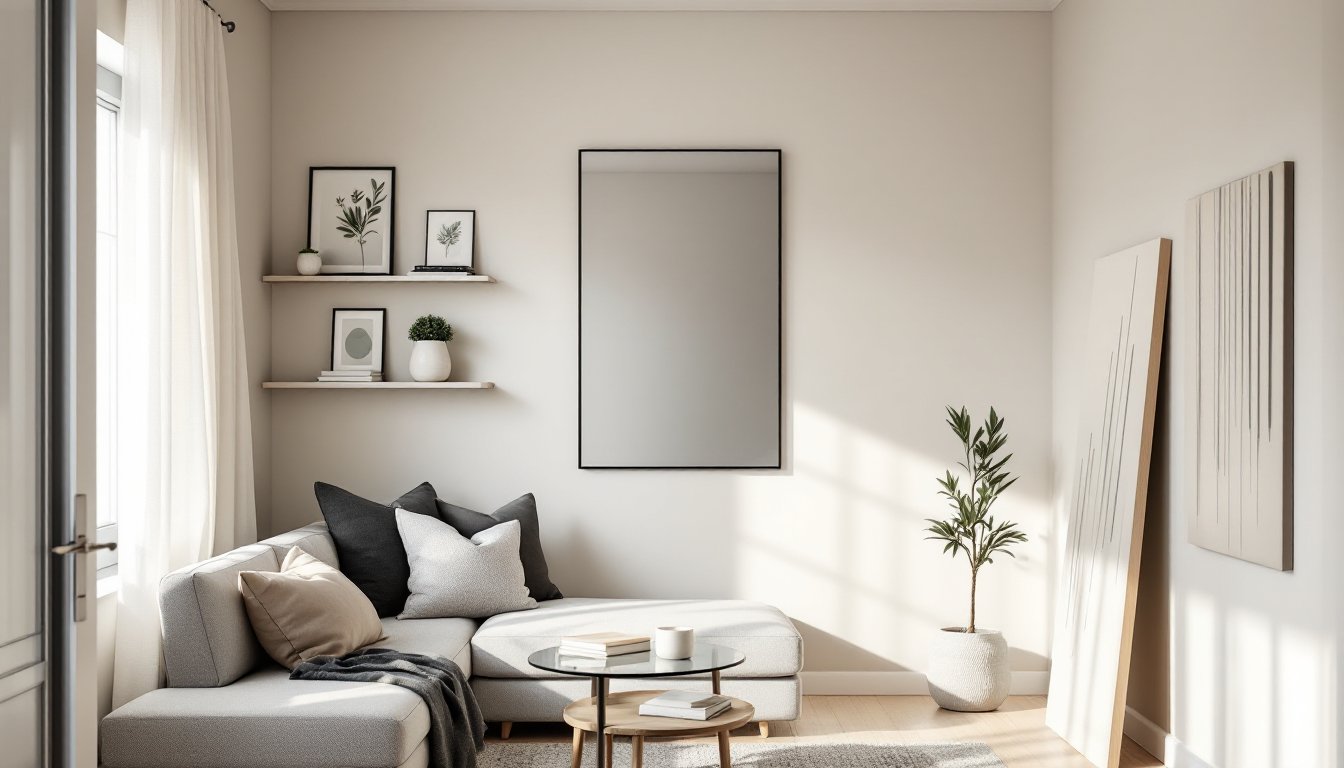
Mirrors remain the most effective tool for visually doubling a room’s perceived size. They bounce natural and artificial light, brighten dim corners, and create the illusion of depth. A 36×48-inch mirror can reflect an entire seating area, effectively adding a second “window” to the space.
Frameless or thin-framed mirrors work best in tight quarters. Heavy ornate frames consume visual weight and can make walls feel crowded. Simple beveled edges or narrow metal frames (1–2 inches wide) keep focus on the reflective surface.
Reflective materials beyond traditional mirrors include metallic wall art, glass panels, and high-gloss acrylic prints. These surfaces catch light without the stark mirror effect, offering subtlety when full reflection feels too bold.
Positioning determines whether a mirror enhances or clutters. Place mirrors opposite windows to capture and distribute natural light throughout the room. A mirror facing a blank wall reflects emptiness, wasted potential.
Leaning mirrors (60–72 inches tall) against walls create height without drilling holes. They work well for renters or those avoiding wall anchors. For permanent installation, use D-rings with appropriate drywall anchors rated for the mirror’s weight. A 30-pound mirror requires anchors rated for at least 50 pounds, standard plastic anchors won’t suffice.
Avoid placing mirrors directly opposite main seating areas. Constantly seeing one’s reflection becomes distracting. Instead, angle mirrors to reflect interesting architectural features, artwork, or glimpses into adjacent rooms.
Safety note: Secure all mirrors over 20 pounds with wall anchors into studs (located at 16-inch intervals in most construction). Use a stud finder to locate framing before drilling. Mirrors are unforgiving when they fall, both to floors and to anyone below.
Gallery walls succeed in small rooms when they follow restraint, not abundance. The goal is cohesion, not coverage.
Limit the palette: Stick to three colors or fewer across all frames and artwork. Black frames with white mats create clean uniformity. Mixing five different frame finishes fragments attention and shrinks perceived space.
Frame size matters. In rooms under 150 square feet, keep individual pieces between 8×10 inches and 16×20 inches. One or two slightly larger anchor pieces (20×24 inches) can ground the arrangement, but avoid oversized statement pieces that compete with furniture.
Spacing and layout: Maintain 2–3 inches between frames, consistent gaps read as intentional design. Layouts work best when the overall arrangement forms a geometric shape (rectangle, square, or gentle organic cluster) rather than scattered randomness.
Template before hammering: Cut paper templates matching frame dimensions and tape them to the wall. Live with the arrangement for a day or two. Adjust until it feels balanced. This prevents unnecessary holes and the frustration of off-center compositions.
For installation, use a laser level to establish a horizontal baseline. Mark light pencil guidelines. Picture-hanging strips work for frames under 10 pounds: anything heavier needs proper hangers and anchors. Most frame manufacturers include sawtooth hangers or D-rings, use both for added stability on larger pieces.
Vertical lines create the illusion of height, making low ceilings feel taller and cramped rooms less confining. The principle is simple: guide the eye up, and the room expands perceptually.
Vertical paneling or shiplap adds architectural interest while emphasizing height. Installing boards vertically (rather than the traditional horizontal orientation) exaggerates ceiling height. Use 1×6-inch pine or MDF boards spaced with a nickel-width gap for a clean contemporary look. Prime and paint before installation to avoid visible seams.
Floor-to-ceiling artwork or tapestries exploit full vertical span. A tall narrow canvas (12×60 inches or similar) commands attention without hogging wall width. Textile wall hangings soften hard surfaces while adding warmth, bonus in rooms with excessive drywall.
Vertical shelving units serve double duty. Tall, narrow bookcases (12–18 inches deep, 72+ inches tall) provide storage while drawing eyes upward. Style them with varying heights of objects, stack books vertically occasionally, incorporate small plants, leave some breathing room.
Striped patterns in wallpaper or wall decals create instant verticality. Choose subtle tone-on-tone stripes rather than high-contrast patterns that can overwhelm. Peel-and-stick wallpaper makes this a reversible DIY project requiring only a utility knife, smoothing tool, and patience.
Installation tip: When mounting tall elements, locate at least one stud for secure anchoring. For items spanning multiple studs, use a level and mount brackets to at least two studs for stability. Toggle bolts work between studs but have weight limits, check manufacturer ratings.
Small living rooms demand dual-purpose solutions. Wall decor that conceals storage keeps surfaces clear while maintaining visual interest.
Wall-mounted cabinets with decorative fronts hide clutter behind attractive facades. Shallow cabinets (6–8 inches deep) work for media equipment, remotes, magazines, and small items. Look for units with interesting door fronts, geometric patterns, cane webbing, or textured glass, that function as art when closed.
Floating shelves with concealed brackets appear to hover, reducing visual bulk. Install them 12–18 inches apart to create functional storage that doesn’t crowd walls. Use them to display a curated mix of books, small plants, and decorative objects. Avoid covering every inch, negative space matters.
Pegboard walls deliver industrial-chic storage with complete flexibility. Paint pegboard to match wall color for a subtle look, or use it as an accent in a complementary shade. Metal or wood pegs hold everything from small planters to keys to lightweight baskets. A 24×48-inch section provides substantial storage without permanent commitment.
Magnetic boards or cork tiles framed as art serve double duty. They display photos, notes, or lightweight objects while maintaining a finished appearance. Frame cork tiles with simple wood trim for a custom look at a fraction of prefab costs.
Mounting requirements: Wall cabinets require installation into studs, no exceptions. Use 3-inch wood screws through cabinet backs into studs. For floating shelves, concealed bracket systems must anchor to studs or use heavy-duty toggle bolts rated for the expected load plus a safety margin. A shelf loaded with books can easily exceed 50 pounds.
Color choices directly impact spatial perception. Light doesn’t automatically mean better, but understanding color behavior prevents costly mistakes.
Light neutrals (whites, soft grays, warm beiges) reflect maximum light and recede visually, making walls feel farther away. Benjamin Moore’s White Dove or Sherwin-Williams’ Alabaster are popular for good reason, they’re warm enough to avoid sterility while maximizing brightness.
But dark walls can work when executed intentionally. Deep colors (charcoal, navy, forest green) blur wall boundaries in low light, creating a cocooning effect that paradoxically makes some small rooms feel larger by eliminating harsh edges. This works best in rooms with ample natural light to prevent cave-like darkness.
Monochromatic schemes expand space by eliminating visual breaks. When walls, trim, and ceiling share similar values, the eye reads one continuous surface rather than separate planes. Paint everything the same color (including the ceiling) for maximum effect.
Accent walls can work in small rooms if approached carefully. Choose the wall farthest from the entry, it draws the eye through the space, creating depth. Keep the accent subtle: one shade darker than surrounding walls rather than a jarring contrast.
Patterns demand restraint. Small-scale patterns (under 2-inch repeat) read as texture rather than busy design. Large-scale patterns (12+ inch repeat) can work on a single accent wall but risk overwhelming. Avoid medium-scale patterns entirely, they hit an awkward middle ground that shrinks spaces.
Application tips: Use primer on all surfaces before painting, especially when going from dark to light or covering existing colors. Two coats of quality paint provide even coverage and durability. Cut in (brushwork along edges) before rolling to avoid lap marks. A 9-inch roller with ⅜-inch nap works well for smooth drywall. One gallon covers approximately 350–400 square feet, so a typical small living room requires 2 gallons maximum, including ceiling.
The right wall decor turns limitations into advantages. Small living rooms reward thoughtful choices, pieces that serve multiple purposes, colors that manipulate perception, and arrangements that guide rather than confuse the eye.